How do they make those Tasty style videos? I’ve filmed and edited over 1000 videos for clients and my own channels … every client and sponsor has been asking for overhead tutorial videos, like Buzzfeed’s Tasty does. In this post, I’ll share the beginning to end of everything I’ve learned in the last 6 years of making overhead videos. I’ll cover equipment to use for every budget, the pros and cons of different set ups, and so much more.
This post contains affiliate links; if you make a purchase from these links, I may earn a commission at no additional cost to you.
I set up this table of contents to help you to navigate this post easier and jump right to the info you need most.
Table of Contents:
- Why shoot overhead videos?
- Equipment for shooting overhead videos
- Audio Equipment for Overhead Videos – mobile and desktop
- Video Editing Software for Overhead Videos – mobile and desktop
- How to Get Started with Overhead Videos … at any skill level
Why shoot overhead videos
It’s seems like the best tutorial videos are the ones that are shot from overhead. Why is it that sponsors and clients are always requesting overhead tutorial videos? I’ve seen calls for campaigns where the sponsor spells out that they want fast past videos shot from overhead. The virality factor for these videos is huge and that’s why everyone wants them … and everyone is making them.
Let’s dive in to see why tutorial videos are popular on social media and with clients:
Easy to see most of the action
Overhead tutorial videos give a bird’s eye view of the action. When shooting from the side of the action, using a tripod or other mount, your hands or arms can block essential action from being seen in the video. Overhead videos make the viewer feel as if they are the one performing the action, which makes it easier to understand how to do whatever the video is demonstrating.
Captivating angle
Overhead videos are mesmerizing because the angle captivates people’s attention. Like I said before, people can imagine themselves doing the actions in the video very easily when they watch a video shot from directly overhead. And because of that, their attention is easy to grab and hold on to with these videos.
Add visual interest by using b-roll
You can use overhead videos as b-roll or or as the main focus when editing your video. Using b-roll, or a second camera angle, in your videos make them more visually interesting. Pair this with the captivating nature of overhead videos and you’ll be positioning your video for success!
Best situations for making an overhead video tutorial
While overhead videos have many great benefits, there are definitely some videos where shooting overhead does not make sense. Basically if shooting the video from overhead enhances the story-telling or the viewer’s understanding of the project, then shooting overhead is a good idea. If you’re just making videos shot from overhead because they are trendy, think about if the viewer’s understanding of the materials is enhanced by the overhead camera angle. If the overhead doesn’t make the video a better experience for the viewer, then you should not shoot the video from overhead.
Here are some situations where shooting a video from overhead makes a better experience for the viewer:
- Cooking videos
- Craft and DIY tutorials
- Stop motion videos
- Videos where the overhead angle shows the most detail over any other angle
Some videos, like documentaries or vlogs, feature video footage captured by drones from an overhead angle. While drones are great for capturing overhead video and creating a great experience for the viewer, they are not necessarily a good option for capturing overhead video for making tutorials. I really want a drone but I can’t justify the cost … and they’re not really recommended for indoor use. If you want to make overhead tutorial videos, you don’t need a drone.
Equipment for Shooting Overhead Videos
The number one reason I wrote this post is because I was in the same place you might be, about 5 years ago: searching online for ways to make overhead video tutorials. I wanted to shoot overhead videos. I knew there had to be specialized equipment for making these videos … I’ve even filmed with professional crews for clients and at events and I saw what they mounted their cameras and lights on. I knew the specialized video equipment existed. But at the end of the day, I couldn’t seem to find this equipment anywhere.
Video Equipment Terminology
The main problem was that I didn’t know the proper name or terminology for the camera equipment I was searching for. And, at that time, and even still now, many of the sites selling this equipment have search engine optimized their online content for the proper name of the equipment and not the plain language regular people would be searching for. That means when you search for “overhead camera rig”, you’ll never find the proper equipment you’re looking for because it has a different technical name and that’s the terminology used by the websites selling the equipment.
It’s no wonder I got nowhere when I was searching for “overhead camera rig” … what I was looking for was a “C stand with Boom arm”.
How the heck are we supposed to figure out that is what it’s called?!

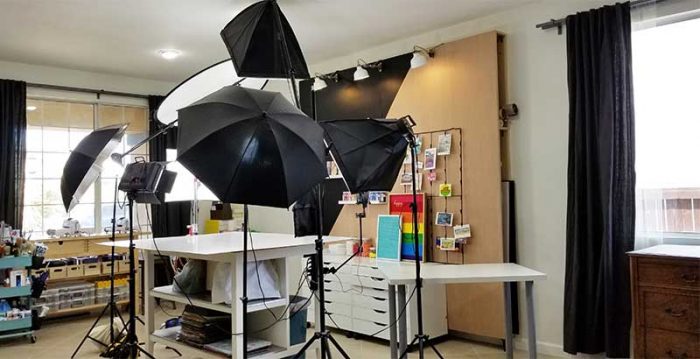
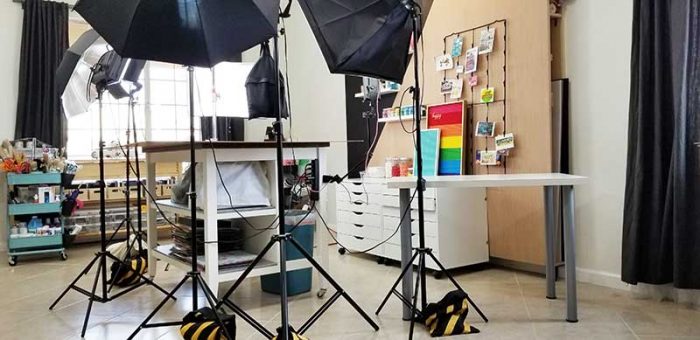
This is my current video studio. Watch the video below for a full tour and explanation of everything in my video studio:
Here are the links for all the equipment I use right now:
- C Stand with Boom Arm with Camera Connector
- Cheap tablet – I use this as a monitor
- Manfrotto Articulating Arm to hold the cheap tablet out of the way but so I can see it while shooting using this Tablet Holder
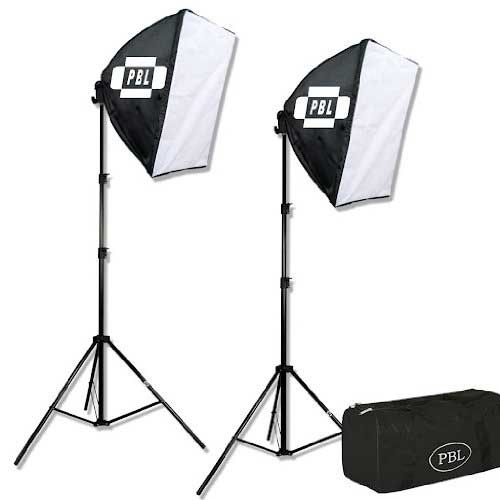
- SoftBox Light Kit with Boom Light
- Sandbags
- Multi Outlet Extension Cord
Here’s how my equipment has evolved over the years:
- I started with a $14.99 tripod from Walmart.
- I set up the tripod at my right arm. On the floor, angled down down towards my table.
- I kept bumping the tripod with my arm.
- I cleared a space on the table and set up ont he tripod on the table, angled as far down as I could get it to go. I filed this was for about a year.
- Searched for “overhead camera mount” online and got nowhere. I knew it existed …
- Converted a clamp-on spring arm desk lamp (that I found at a Habitat for Humanity ReStore) into an adjustable camera rig – it could only hold a camcorder becasue a DSLR was too heavy
- Since the lamp base had to be clamped to the table, my table shook during the video. I wasn’t able to correct this during edits – I needed something free standing that could hold my camera.
- I went to a conference where a video expert told me that what I needed was called a “C stand with a boom arm”. I put that into Google and found so. Many. Results.
- I dug into Amazon reviews and bought the cheapest C stand that could go 10 feet high (up to my ceiling).
- I got it. It needed another piece to put on the end to hold the camera.
- Amazon order #2 arrived and I set up the camera. I had to also get sandbags and buy a bag of play sand to fill them so the rig would nto topple over when my camera was hanging on the end.
This process took place over 3 years. It wasn’t until I was 4 years in that I got real bonafide video studio equipment and mounts.
I’d say to start off your video making career, you’ll need these:
- SoftBox Light Kit with Boom Light
- C Stand with Boom Arm with Camera Connector
Budget about $250 for this basic C stand and softbox set up. With this basic set up you have everything you need to start making videos. As you create more videos, you’ll start to discover things that need improvement. Maybe there are shadows on one side of the frame or maybe you notice that the light is more yellow on one side … in these cases you can buy a solution for your specific studio to help address this issue.
You don’t need to spend thousands of dollars to get your studio set up. I am sharing this post to show what I have after 6 years of making videos but this might be overkill (or not enough!) for your space and situation. You won’t know what’s missing and what works until you start making videos. Start with the basic equipment I just listed above and then let your tools evolve over time, as you find problems you need solutions for in your own space.
Should I DIY video equipment?
There is a lot of advice out there about shooting videos on a budget. What I found was that DIYing is not always cheaper than buying the proper equipment from the get-go. While you might not have a huge budget to get started, consider why investing in true video equipment is a good idea:
- DIY, jerry-rigged studio equipment usually costs about the same as buying the “real thing”
- Moving, setting up, and manuevering around DIY equipment is difficult.
- The “real thing” is made to be moved and adjusted; it shouldn’t get in your way while you’re shooting.
The majority of the equipment and tools I recommend in this post are the “real thing” and will save you time and frustration. I’d love for you to avoid the growing pains I went through as I learned how to DIY overhead videos myself through trial and error. That said, there are DIY solutions and alternatives to the tools I recommend. In this post, I’ll explore both options to help you make the best choice and decision for your business.
Mount for the camera
The most important tool you need for shooting overhead videos is a mount for the camera. There are several different options for camera mounts that have various benefits and challenges. You can use a tripod, a ceiling mount, and a c-stand with a boom arm. And then there are the DIY camera mount options! We’ll take a look at the pros and cons of each option to help you choose the best camera mount for your video project.
Tripod – Pros and cons of using a tripod for overhead videos
I use two tripods when I shoot my videos … but I don’t use a tripod to shoot the overhead portion of the video. Here’s how I use tripods when shooting videos now:
- I place one tripod facing me to capture video of me talking to the camera at the same time I capture the overhead video. This way I can sync the clips in the editing software and cut between the overhead shot and me talking for a better viewing experience.
- I will place a tripod holding the camera at 45° angle pointed at the action. I’ll shoot this video at the same time as I shoot the overhead footage, sync them, and then cut to the angle shot as the b-roll, like in this video.
- I’ll use tripods for location shooting, like when we are in a park or somewhere that it’s took difficult to bring the overhead rig.
For years I did use a tripod to shoot videos over my shoulder. This is one option until you are ready to upgrade your equipment.
Tripod with a boom arm
You can also get a tripod that has a boom arm attachment on top. You will need to carefully position the legs of the tripod so they are out of the shot when you are recording your video. Many food bloggers use a Manfrotto tripod with a boom arm (but I like this one better) to record food videos because the distance between the camera and the tabletop is only a couple of feet, at most. If you need the distance between the table and camera to be greater, you’ll need a different type of rig to shoot the video.
When do you need a tripod with a boom arm to shoot videos?
- The distance between the camera and the surface you’re filming is less than a few feet
- You’re filming on location or need a mobile shooting rig
I wanted to shoot larger projects that might be 6 feet wide. In order to get the full project into the frame on the camera, I had to get the camera up really high and if I was using a tripod, the legs would show. Luckily, there’s another option: a c-stand with a boom arm.
C Stand with Boom Arm – why I use this to shoot my overhead videos
For many years I was googling trying to find something that would hold my camera straight overhead above my projects while I filmed. I just didn’t know what it was called. And I also had a perception that this kind of video equipment was expensive.
Little did I know, you can find an overhead shooting rig, or “C-stand with boom arm” on Amazon for about $130! Yes, what you need to shoot overhead videos is a C-stand with boom arm. I recommend this C-stand on Amazon:
- Neewer C stand and boom arm with this connector (you need both items)
Camera Mounts
C-stands can be used to hold all kinds of equipment, not just cameras. You may need to be an accessory for the end of the boom arm that allows you to attach a camera to it.
There are lots of different types of connectors that will hold your camera to the end of the c-stand.
I started with a screw-on connector because it was very secure but I also found that it was time-consuming and troublesome to mount and remove the camera from the boom arm between sessions.
I then upgraded to a plate system where a plate slides into the connector on the end of the boom arm and is tightened in place with a screw or a latch. This system is similar to the plate system used on the top of tripods – this is the one I use.
Be sure to check the specs for the c-stand with boom arm that you plan to purchase to see if it includes a connector for your camera before you order.
Making your own overhead video rig
Now you might have seen people suggest that you build your own rig for holding your camera overhead as you record your videos. After many years of filming videos, I think it is important to use the proper equipment for video creation.
I have found that many of the DIY overhead filming rigs shown in tutorials cost about the same to make as buying a c-stand with boom arm. Also, these DIY filming rigs tend to be bulky and difficult to move. However, there are some really great tutorials for creating your own DIY overhead filming rig. You can find a bunch of top down video tutorials here on YouTube. And I found this post about Casey Neistat’s overhead rig … and this one about his old studio … and this one with his new studio.
Ceiling mount or wall mount for overhead videos – when to choose a static ceiling camera mount
A few of my favorite craft video creators use a stationary ceiling mount for their cameras. These mounts are secured directly to the ceiling so they do not take up any floor space and there are no sandbags needed. Here are some mounts to check out:
You may need an extra part to connect the camera to the mount … be sure to look at all the specs on these pieces before buying.
Many of the YouTubers I know who use these have the camera mounted permanently on these mounts and they collect the video footage via a tether from the camera to their computer. I’ll get more into tethering and monitors later but it’s important to note that when using an overhead ceiling mount for your camera, you will need to have some way to pull the video files from the camera and to look at the footage while flaming to check your hand position and so on.
Phone Mount Stand – the solution for phone videos and Facebook Live
If you are going live on your phone, a c-stand with a boom arm is not the best solution. With a live video, you usually start the Live video while holding your phone in your hand, with the phone focused on you speaking. Then you move the phone to position it to view the action from overhead. The problem with a boom arm is that you need a different connection to add a phone to the end than for a DSLR. It takes another step of preparation and another piece of equipment than using a C-stand with a boom arm to record a video with a DSLR or camcorder.
One of the unique challenges with filming overhead while broadcasting live on Facebook Live, Instagram Live, YouTube Live, or Twitter Live is that you can’t see any comments or reactions coming in while you’re filming from overhead. You will need a second device that allows you to see the comments and reactions on the live video and react to them verbally during your broadcast . This makes a better experience for the viewer, as Kathy Cano-Murillo, Crafty Chica, mentioned during a Facebook Live broadcast about what makes a great Facebook Live strategy.
How to see the comments during a Facebook Live overhead video:
- Use a tablet to view comments – I use a holder to keep my tablet out of view and easy to see
- Watch the broadcast on a laptop off screen that you can look at while broadcasting
- Use a third party software like BeLive that allows you to broadcast from multiple devices. Start the Live with your webcam on your laptop and then use your phone as a second device – BeLive allows you to switch the stream between devices or use multiple devices at once (like if you want to display your face in the corner while showing the overhead part of the video.
Other video equipment
It’s easy to focus on the cameras and tripods but you might also need some other accessories to make shooting videos easier.
- Multi Outlet Extension Cord – with all the lights, tablets, and so on in my space, I needed a lot of outlets. Rather than use multiple extension cords, I found this one that has outlets along the length of the whole cord!
- Trash can – I keep mine under the table so I can easily toss trash while I am working, without stopping
- Staging table – a table to the side of the shooting area that has supplies and ingredients ready to go can save tons of time. I position a plastic folding table or an old Ikea table within arms’ reach of where I am standing but out of the shot. I then stage all of my supplies on this in order so I can grab and shoot without stopping.
- Reflector – you can use a reflector to bounce light from one place to another. You can buy reflectors or use a piece of shiny white foam core board to reflect the light.
- Diffuser or Scrim – if you have bright lights shining onto your video creating shadows, you can use a diffuser or cover the light source with a piece of sheer fabric (but don’t get it too close so it won’t catch fire).
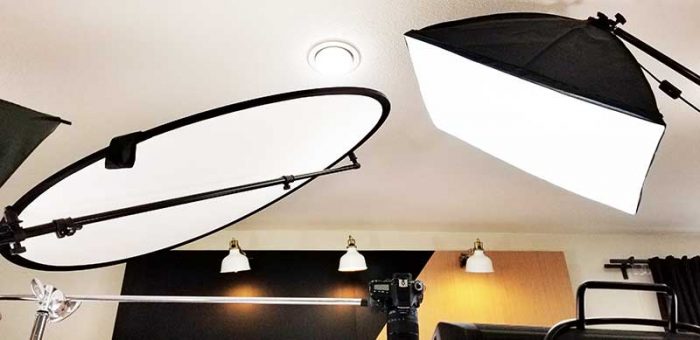
This scrim (circle thing on the left) diffuses the light from the can light in my ceiling.
Backdrops and Backgrounds
Who knew there was so much to think about with videos?! The background of the video or surface you are shooting on is just as important as the subject itself.
Keep this in mind:
- A dirty work space can distract viewers from paying attention to your video subject
- The background color should compliment the subject. Avoid colors that will clash
- Avoid patterned backgrounds because the pattern can look like it is dancing or moving on the video
- Avoid white unless you have to use it; if the color is off slightly in your video, it will show on the white background. It can be really challenging to make the white look white and have the skin on your hand still look natural when you are trying to color-correct in the video software.
You can also use backdrops for still photos for your blog posts and thumbnails, like this blue wood backdrop we painted to use for our food videos.

Here are ways to get backdrops for your videos:
- Vinyl – you can download stock photos of wood paneling or other table-like images and get them printed on vinyl sheets. These roll up for storage when you are not using them and they are easy to clean! You can also order printed vinyl backdrops on etsy.
- Poster board – you can buy a pack of multiple colors and swap them out between videos. You can do the same with foam core board – I get huge sheets of this at Hobby Lobby. Here’s a video shot on posterboard.
- Plywood – paint wood panels to make gorgeous backdrops. I shot this video on a wood backdrop we painted. Brooke Lark has a great tutorial on how to do this with metal sheets.
- Laminate board – I love white backgrounds on videos, even though they can be a challenge when editing for color. I lay a piece of white laminate I got from Home Depot onto my worktable and shoot my videos on it. Here’s a video shot on a white laminate background.
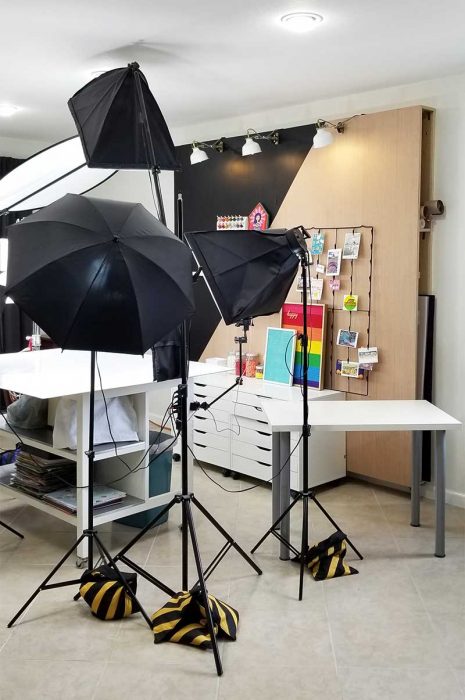
Sandbags
The camera or any other equipment hanging on one end of the boom arm can cause it to tip over because the weight is not evenly distributed. You need a counter weight to balance out the arm and keep it steady; this is what the sand bag does.
Here are a few options when it comes to counter-weights for your c-stand with boom arm:
- purchase photography sandbags and fill them with play sand – I use these ones
- fill zip top bags with sand to make your own sandbags
- use weight-lifting weights to weigh down the base of the c-stand with boom arm
Cameras for shooting overhead videos
Phone
You can use your smartphone to shoot videos. Most newer smartphones shoot excellent video. And you can use an app to edit the video right on your phone.
One of the drawbacks to using your phone to shoot videos is that it can be a challenge to edit on the phone due to the small screen. And for Android devices, it can be a challenge to get the video footage from your phone onto thre comptuer so you can edit the video.
All that said, I use my phone to shoot almost all video when I am out of the studio. And if I am shooting videos for Instagram Stories, I almost always use my phone.
DSLR
I think a DLSR is the best choice for shooting overhead videos. A fullframe camera is overkill and much heaviver than a DSLR. But a DSRL gets better video quality than a mobile phone or typical digital point and shoot camera.
After I stopped using a camcorder to shoot videos, I started with a Canon Rebel T2i DSLR, then went to a Canon 70D, and now I shoot with the 70D and a newer Canon 80D. The best deal on these is to get a kit. Canon makes kits specifically for video creators that include many accessories that will make shooting videos much easier. I like this kit because it comes with a mic in addition to tons of other accessories.
Many DSLRs now come with apps that allow you to control them from your smartphone or a tablet. And for even more speed when shooting, you can tether the DSLR to your computer and see gthe footage on-screen while shooting. I also like how easily you can use the app to switch between between and stills, which allows you to take crisp step out photos without ever touching the camera. Whenever you touch the cameras, you’ll need to wait a few minutes for it to stop moving or vibrating because you start shooting again so it is important to use an app to control the camera to avoid these wait times.
Monitor – how to see what you’re shooting when you can’t look through the camera
You can get a true monitor for viewing what the camera “sees” while it is shooting from overhead but I have some hacks for this.
Camera makers like Canon have released apps that allow you to use your smart phone or a tablet as a monitor. I use the Canon Camera Connect app to make either my phone or tablet into a monitor. From the app, you can switch between shooting video or stills, set focus points, and so much more.
What I love about the apps is that it allows you to use tools you probably already have as a monitor instead of buying another piece of equipment that only has one function.
Here’s what you need to use a tablet as a monitor for your videos:
- Cheap tablet
- Way to hold the tablet – I have mine in this holder on this arm attached to the leg of my work table
- App to control the camera remotely, like Canon Camera Connect
- Usb mini-b to usb micro-B cord – I like this long one (connect tablet to camera if using an older DSLR without bluetooth)
I have not figured out how to create a monitor situation when using a smart phone to shoot videos but if you know one, let me know in the comments!
Audio Equipment
I’ve heard so many times at conferences and video training courses that people will forigve a video with bad visuals if it has good audio but they won’t watch a video with great visuals and bad audio. The key to great audio is a microphone.
Now for most overhead videos, you will likely remove the audio recorded during the filming and add a music track to the video. In this case, you don’t need a mic. But if you plan to do voiceover on the video, where you record your voice talking while the video plays, you will need a good mic. And if you plan to record a clip of you talking about and introducing the porject, you’ll also need a mic. Here’s what I recommend:
- Recording you speaking into the camera – get this one to record into your phone or this one for wireless recording
- Recording voice over as you watch the edited video – I started with a Blue Snowball microphone but now I use this one.
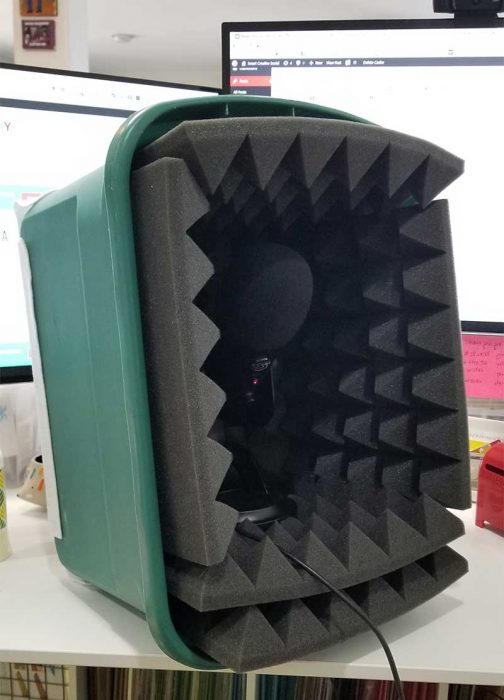
I also created a sound box to prevent the microphone from picking up an echo in the room. To make the box, I set my microphone into a plastic bin lined with these and then I hit record. You can hear the difference in the sound with the box here and without the box here.
Music for videos
The easiest way to deal with audio is to remove the audio on the video clips and then add music.
Consider this when using music:
- You will need a license for music to use it legally
- What can happen if you don’t use a proper license for the music on your video
- Loss of ad revenue. The owner of the music can make money from ads placed on your video content on YouTube if you use their msuci without the proper licen
What kind of music license do you need?
You need a royalty free music license that allows you to use the music for commercial purposes. Whether you are making money from your videos or not, you need to get permission to use the music in the video and that’s what a music license does; the license shows you have permission to use the music. Find out more at Creative Commons.
Free music sources
With any of these sources, I recommend taking a screenshot of the license page when you download the track. Save this screenshot because sometimes the licensing changes but if you have a copy to show you can use the music, you can likely avoid any copyright take-down issues or issues with YouTube swiping the ad revenue from the video.
YouTube Audio Library
You can find free music to use on YouTube’s Audio Library. Here’s what you need to know:
- some of the Audio Library music requires that you give attribution to the artist by mentioning their name and the track title in the video and in the description. If you do not provide attribution, the owners of the music can capture the ad revenue from your YouTube video.
- I choose the music from the YouTube Audio Library that does not require attribution and that is allowed for commercial use
Free Music Archive
I started using Free Music Archive way back in the beginning … you’ve got to spend a lot of time listening to tracks to find one you really like but it’s free so you can’t beat that!
Other free music sources
I use Free Music Archive and YouTube’s Audio Library the most but here are 10 more places to find royalty free music … for free!
Royalty-Free Music Licenses
I uses these two services to purchase commercial-use royalty free licenses for music:
Audioblocks by Storyblocks
Audioblocks is an annual subscription service that allows you to download unlimited tracks and sound effects with a commercial use license. I use a lot of sound effects from this service because a lot of the music is too hokey for my taste but they do excel at holiday themed music. The bonus is that everything you download has a lifetime license so even if you sign up for one year, you can keep using that music forever.
ArtList.io
Lots of people use music from free sources or from discount music sites and after a while, you’ll notice the same songs showing up in videos. I didn’t want to be using the same music as everyone else … plus a lot of that music was pretty hokey. That’s why I purchased an Artlist subscription; so far, its the best music I’ve found online. Get an extra 2 months free here!
Video Editing Software – the best choices for overhead videos
There are so many choices for software to edit videos that it can be difficult to know which to choose. In addition, video editing software can be confusing to use, especially if you have never used any kind of graphics or audio editing software before. You’ll have an edge getting started with video editing if you have already edited photos using a tool like Adobe Photoshop or you’ve edited audio files with a tool like Adobe Audition.
Whether you have experience or not, I’ll walk you through the best video editing tools in my opinion, no matter your skill level or whether you are using a computer or mobile device to edit videos. These are the main options when it comes to video editing software:
- Mobile Video Editing Apps
- Online Video Editing Apps
- Dekstop Computer Software
Best Software for Editing Videos
I absolutely believe that Adobe Premiere Pro is the best video editing software. Here’s why:
- Constantly updated
- Works with and connects with other Adobe programs
- Powerful
- Adobe is creator focused. Adobe works with creators to test new products and make improvements to software like Adobe Premiere Pro.
- There are loads of tutorials on Adobe’s site and YouTube to help you learn the software and learn how to create the effects you want for your video
You can get started with Adobe Premiere Pro today with the Adobe Creative Cloud subscription program.
Even though I absolutely love Adobe Premiere Pro, you don’t need Adobe Premiere Pro to start your journey into creating videos.
Mobile Video Editing Apps
I don’t typically edit videos on my phone because I like the larger screen on my desktop computer better. That said, I have edited videos on my phone when in a pinch.
I recommend searching the app store for your device to find a video editing app that has features you are looking for, such as adding text overlay, and has a high rating. For Android, I have use Adobe Premiere Clip to edit videos on my phone and they turn out pretty well. For iPhone, I have heard many people recommend iMovie.
Online video editing Apps
This would include apps like Lumen5. Some of these have mobile apps you can use to edit as well. These apps allow you to combine videos and photos to make a video.
How to Get Started with Overhead Videos … at any skill level
Download the Overhead Video Checklist HERE
Got more questions? Join the Smart Creative Social COMMUNITY on Facebook; it’s a free group where you can ask questions and get help from me and the rest of the community.


Pingback: How to Get Started with Overhead Videos … At Any Skill Level - Craft Industry Alliance
Such a brilliant video. Very helpful. I am moving into the vlogging space and building a photo/craft studio in a much smaller space. I was looking for an “overhead camera” (Now I know the correct name for it :-)). Thanks so much for such helpful info. I would love to know more about your external storage. I recently lost a ton of stuff on my external hard drive which wasn’t backed up. Thanks again.
Thank you so much for all the info! You’ve helped me set up my studio so I can shoot my paint pouring videos for YouTube!!
I did want to mention that the Canon Camera Connect app only works with Canon cameras that are Wi-Fi enabled. I shoot with an older DSLR Canon Rebel T1i, so I had to use my small TV as a monitor using a USB to Mini USB cable.
Thanks again for all your information!!
Jennifer — thank you SO much for sharing this incredible article!!
After a few video attempts, I immediately realized shooting on my smartphone was too laborious to be practical. I wanted to upgrade ASAP but there are so many options and opinions out there, it’s sort of overwhelming. But your overview provided exactly what I needed to read as I’ve been setting up my new craft blog & business 🙂
This afternoon I just put together my Neweer C-stand with the ball-joint attachment you recommended — so impressed with the durability and flexibility of the setup. Can’t wait to get my camera and the sandbags in place to start shooting!
xx, Jessica
silverleafstudio.org
Oh my gosh I am so glad to hear this!! Do you have a link to your video so we can see it?
You can use Quicktime on a mac desktop or macbook laptop (perhaps on a pc but I havent tried it) with an iPhone to have a “monitor”. You have to connect your iPhone with the USB cable. Obviously not cheap or ideal, but if you have these things, it works. I don’t know about other phones, I only have an iPhone.
Thanks for sharing 😉
I’m no food vlogger, but this was, for me, still both an educational and very enjoyable article, which has given me a few ideas for my own work. The best morning read I’ve had for a while. Thank you and take care.
Fantastic article, Jennifer! Thank you! I actually do use my iPhone 11 Pro Max to shoot my videos and (because I’m deep into the Apple eco system) it works seamlessly to airdrop footage from phone to ipad to iMac for editing, yadda yadda. My space is on the smaller side (small spare bedroom), but it’s all mine and it works. My only drawback is the echo on audio (too many hard surfaces) so I have to do voiceovers (after filming) in my closet, LOL! When the budget is tight, we make do, right?! Thanks again for a fabulously detailed article!
Jennifer,
Thank you for sharing this information. Now I know what really need.
Awesome! I am so glad to hear that!
Very helpful. What about the lens? I’m using Canon 70d and unable to workout what lens to use for cooking videos
You can use any lens but the 70D does not autofocus on video if you are moving up and down (towards and away from lens) so you may want to get a newer version of the Canon like the 80D OR you can just keep the same depth of your hands while filming 🙂
This is so helpful!!!! I was struggling so much with how to do overhead videos, so this article is such a lifesaver!! Thank you, thank you.